Updated May 2011 with easier access to the free pattern.
(See below)
This is my favorite gift to make for my grandchildren when they turn 1 year old. It's perfect for little fingers to grab as they chase it around a living room or play room. The finished ball is about 8" in diameter.
Update November 2012: Here is a video of a 6-month-old baby successfully playing catch with one of these balls. They are WONDERFUL for babies!
Materials:
You can make it with a variety of fabric scraps, or with two colors (one for the outer surfaces, and one for the inner surfaces). If you scroll down through the tutorial, you will see both styles of balls. If you choose to make it with two different colors, you will need about 1/3 yard of the inner fabric and 1/4 yard of the outer fabric. Other materials:
Matching thread
Sewing machine
Scissors
Needle for hand-stitching
Polyester fiberfill for stuffing
Directions:
Cut out 12 of the half-circles and 12 of the football shapes (see pattern below).
With right sides together, sew one football to one half circle. Begin by making a tiny, tiny snip half-way along the curve of the half-circle. It's only about 1/8" of a snip.
Here's another picture of the tiny snip.
Then lay a half-circle and a football shape together like this. Remember to keep right sides together.
The stitching will go in the direction from the bottom of the half-circle up to the middle, BUT don't start at the very bottom!
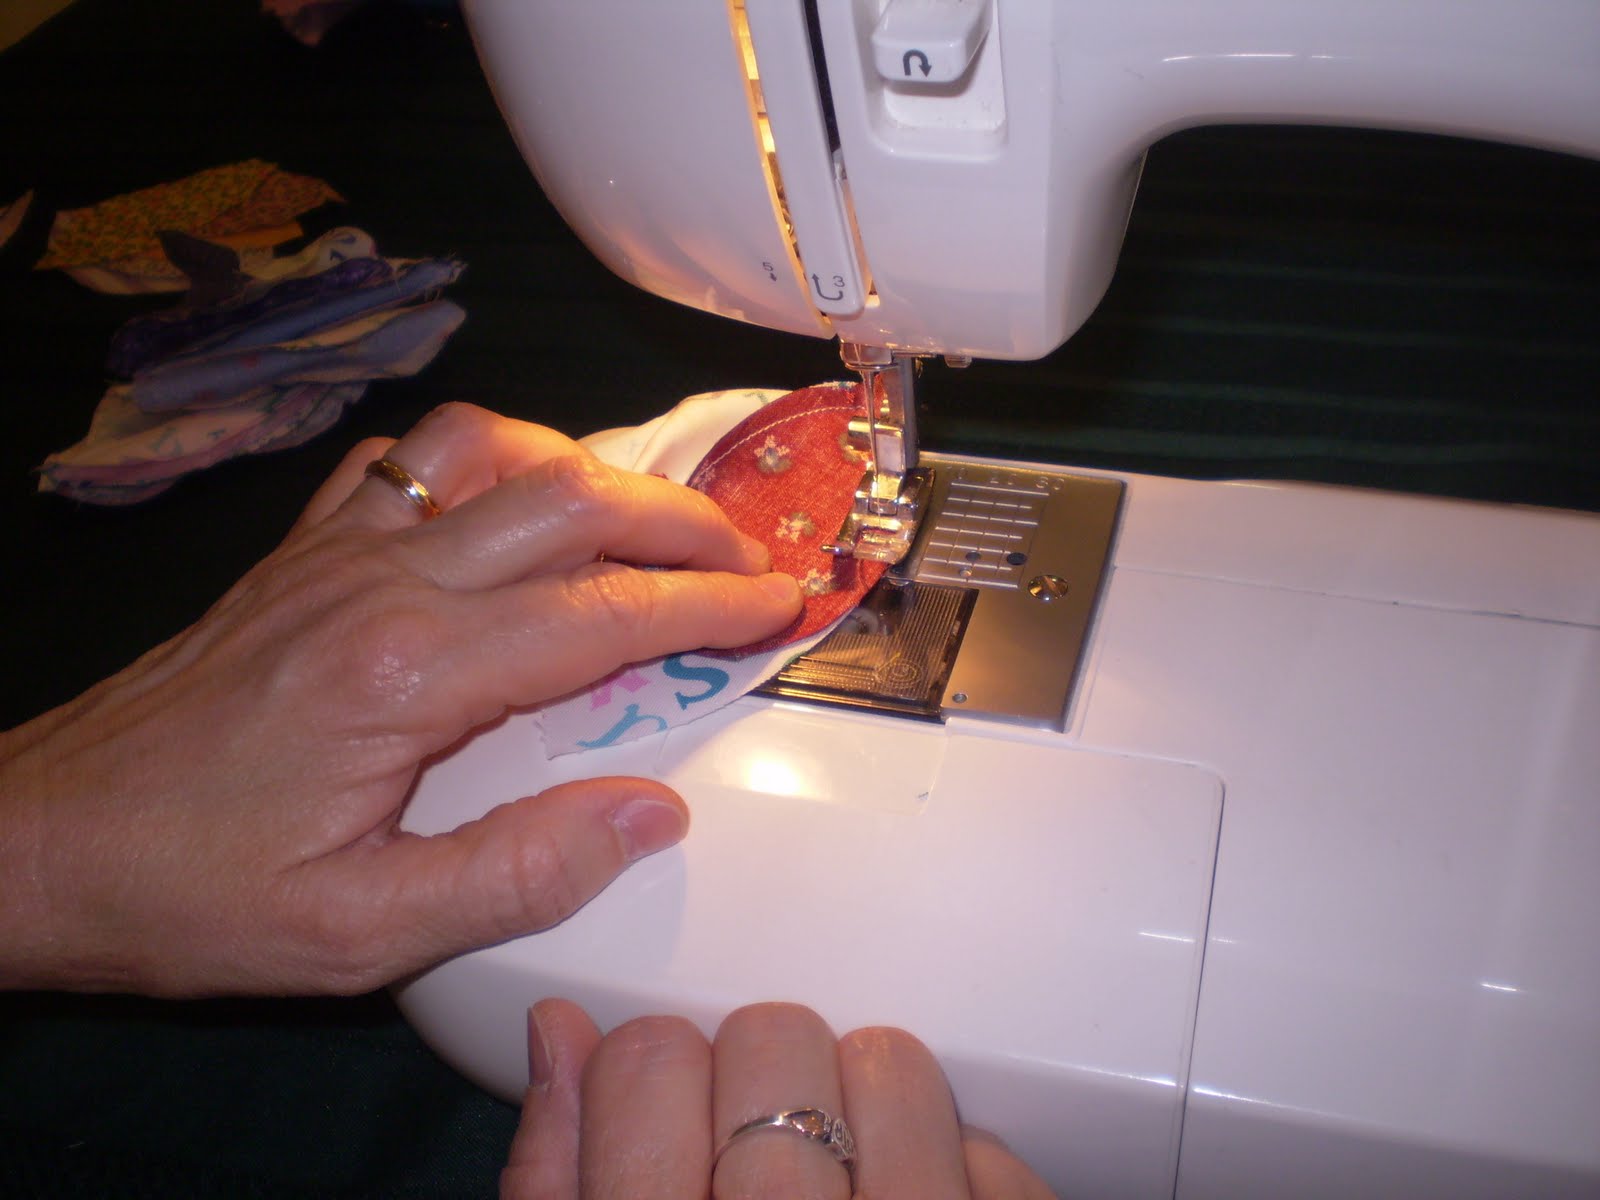
You will begin stitching about 1/4" from the bottom corner, (see where the scissors are pointing to?) and the seam allowance will be about 1/4". Go ahead and begin stitching about 1/4" in, and be sure to backstitch at the beginning, as these corners need to be strong.
Continue stitching carefully along the football.
Stop BEFORE you get to the very corner of the football. You are going to need to pivot about 1/4" from the end of the football, and pull the football over to stitch along the other side of the half-circle. Like this:
Now you will see why you made that teeny little clip at the beginning, because this allows you to turn the half-circle to the other side of the football. Line things up for the first inch or so and begin the stitching. Don't worry that it all doesn't easily line up right when you make the turn. It will get easier as you go along the other side.
See? It's lining up better now. Continue carefully along your 1/4" seam allowance. Stop before the very end, and line up your stitching with where you started.
Like this. Backstitch again to secure the threads and...
The top should look like this.
Repeat for all 12 of the half-circles and footballs. Now you are ready to begin stuffing.
Stuff the little shape firmly with the polyester fiberfill.
Have your needle and thread ready to go, with a knot in the end of the single thread. Now you are going to have to get firm with this little puffy shape, and fold in the seam allowance (about 1/4") of the half-circle edges. Don't worry about the whole seam for now, just make the very top corner behave, and begin stitching the edges together with a slip stitch or a whip stitch (slightly easier, but more of the stitches will show). As you go along, you will be able to continue working with the edges to fold under to the seam allowance, and sew the rest of the edge.
You will end up with a shape that looks kind of like a puffy triangle with a football shape at the top. Tie a good secure knot at the bottom.
I like to finish off my thread by poking the needle partway through the stuffing and back out again, at any random place, then snipping the thread next to the fabric. The end of the thread will disappear into the stuffing, and the knot will stay secure. (Sorry these pictures are in my lap - they were taken in the car on the way to my darling granddaughter's birthday celebration. It was a long drive...took me about an hour in the car to do all the stuffing and sewing you see here and below.)
Repeat with all twelve of the little shapes. Now you are ready to sew them together into a ball.
The rest of the photos were taken with the two-tone ball I'm making for another grandchild. This will let you see a different style, with only two fabrics.
Sew two of the puffy shapes together, at the bottom and at the point of the footballs.
Then add a third one.
Sew the last two football points together, so that you get a three-piece segment of the ball. Repeat three more times with the other nine pieces. You will have four sections that look like this.
Now sew two of the sections together, stitching together at the football points and at the bottom.
Add the third section in, attaching at football points and the bottom.
When you add the last (fourth) section in, it's a little tricky to sew the bottoms together. You can skip that step if you want to, but I like it better with them all sewn together. Again, stitch the football points together and...
You have created a wonderful ball for little fingers to squeeze and throw. Congratulations! If you make one of these balls, I'd love for you to email me with a photo, or post on your blog and send me the link. If you have any questions about these directions, I would be happy to answer your questions via email:
haynieoregon@gmail.com
Have fun!
Here's the birthday girl enjoying her new ball. Like her outfit? Check out her mama's blog, Helping Little Hands. Tons of great craft tutorials...that cute little skirt is made from recycled jeans! And her mama made a Very Hungry Caterpillar cupcake-cake to keep the theme going at the birthday party. Directions for all of these great ideas will be on her blog. Here are some ideas that her mama posted for super birthday gifts for one-year-olds, including more photos of the fabric ball.
Here's a link to another photo of a fabric ball, made by my good friend Dorothy for her one-year-old granddaughter. Beautiful, bright colors! And there are more fabric balls here. And a fun update to the worldwide fabric ball movement here.
Here's the updated link to the pattern: FREE PATTERN The link below to the pattern on Scribd is 1) upside down and 2) requires a sign-in to Scribd that I don't have. But it's the same pattern on the link above. Enjoy!
Pattern: (Oops! Ha ha - sorry the pattern is upside down...that's ok, just print it and turn the paper around. I have reached the limit of my tech skills here, and that's even with help from a son-in-law and a daughter to get the pattern scanned and uploaded. Thanks, Mike and Polly!) Fabric Ball
It's nice to sit and do the handwork while watching a movie or going on a trip. I'm going to finish up the third ball next weekend during General Conference.
Haha! Great tutorial Mom! Yours are way cuter than that yellow one we had growing up, but I always liked that one too. Did you make the yellow one too? Man, the big O would love one of these. Perhaps if she doesn't get one for her birthday I'll have to make her one. :)
This is so fabulous!!! I linked to your tutorial on Craft Gossip Sewing: http://sewing.craftgossip.com/free-pattern-sew-a-fabric-ball-toy-for-little-hands/2010/04/02/
Oh, no! I was just stopping by and have a look at your blog ... and instantly found another project I REALLY want to try!!! I think my list of ongoing projects will never get shorter ... *sigh* This ball looks like so much fun! I guess my son would love it ...
I know you posted this a long time ago, but I recently found it and made one. It turned out great It will be posted on my blog on 11/2/11. (I pre-schedule my posts so my family doesn't get overloaded because I only download pictures about once a month.)http://lifeathomeforus.blogspot.com/
Ohhhhhhhh, Thank you so much for this tutorial!! My mom always made these for her great grandchildren and for us to give to our friends as we all were at "baby" making age!!! I have her pattern (she died in 2010), but there were no instructions to go with! You are a life safer and I am now onto making my first, to carry on the tradition!!!
Ohhhhhhhh, Thank you so much for this tutorial!! My mom always made these for her great grandchildren and for us to give to our friends as we all were at "baby" making age!!! I have her pattern (she died in 2010), but there were no instructions to go with! You are a life safer and I am now onto making my first, to carry on the tradition!!!
I got one made yesterday. My biggest mistake? I way overstuffed it! That makes putting all the pieces together (at the end step), very, very difficult. But, it still turned out so cute!
Its wonderful blog really very nice site and blog facility.every title is very nice and very fantastic concept.Vero Beach Tutoring Thanks for sharing the information.
Really i appreciate the effort you made to share the knowledge.Windermere Tutoring The topic here i found was really effective to the topic which i was researching for a long time
It seems like an educational blog which always some new information to visitors Private tutor Alpine and Enjoying every little bit of it and I have you bookmarked to check out new stuff you blog post.


26 comments:
Nice tutorial, Kathy! When I get bored with making dresses, I'll have to try that and add it to my "grandma toys" in the basement. :)
It's nice to sit and do the handwork while watching a movie or going on a trip. I'm going to finish up the third ball next weekend during General Conference.
Nice job with the tutorial, Mom. We're loving the one you made for us.
Very cool Mama K! I love that. And great tutorial too! :)
Haha! Great tutorial Mom! Yours are way cuter than that yellow one we had growing up, but I always liked that one too. Did you make the yellow one too? Man, the big O would love one of these. Perhaps if she doesn't get one for her birthday I'll have to make her one. :)
Oh wow, that is so, SO cute! I love it. Polly emailed me about these and I'm so glad she did. I would love to link to this if you didn't mind.
This is so fabulous!!! I linked to your tutorial on Craft Gossip Sewing:
http://sewing.craftgossip.com/free-pattern-sew-a-fabric-ball-toy-for-little-hands/2010/04/02/
--Anne
Can't wait to try this... One question do I add 1/4" to the pattern for the seam allowance or is that included???
Thanks again
Michelle
The pattern includes a narrow 1/4" seam allowance. Have fun! I'd love to see a photo when you're finished.
Wow!Excellent work
Thanks for sharing..........
Its fun to do new things.....
Oh that is so great! I would love to make one for my youngest.
Oh, no! I was just stopping by and have a look at your blog ... and instantly found another project I REALLY want to try!!! I think my list of ongoing projects will never get shorter ... *sigh*
This ball looks like so much fun! I guess my son would love it ...
I know you posted this a long time ago, but I recently found it and made one. It turned out great It will be posted on my blog on 11/2/11. (I pre-schedule my posts so my family doesn't get overloaded because I only download pictures about once a month.)http://lifeathomeforus.blogspot.com/
Awesome tutorial, I truly miss you.
Ohhhhhhhh, Thank you so much for this tutorial!! My mom always made these for her great grandchildren and for us to give to our friends as we all were at "baby" making age!!! I have her pattern (she died in 2010), but there were no instructions to go with! You are a life safer and I am now onto making my first, to carry on the tradition!!!
Ohhhhhhhh, Thank you so much for this tutorial!! My mom always made these for her great grandchildren and for us to give to our friends as we all were at "baby" making age!!! I have her pattern (she died in 2010), but there were no instructions to go with! You are a life safer and I am now onto making my first, to carry on the tradition!!!
I got one made yesterday. My biggest mistake? I way overstuffed it! That makes putting all the pieces together (at the end step), very, very difficult. But, it still turned out so cute!
Thanks for sharing such beautiful work. Beautiful and very creative! - haberdashery
POKERACE99 bandar judi terbaik masa depan yang bekerja sama dengan agen terbesar di indonesia
Thank you for your tutorial - I will give it a go 🤗
Its wonderful blog really very nice site and blog facility.every title is very nice and very fantastic concept.Vero Beach Tutoring Thanks for sharing the information.
Really i appreciate the effort you made to share the knowledge.Windermere Tutoring The topic here i found was really effective to the topic which i was researching for a long time
It seems like an educational blog which always some new information to visitors Private tutor Alpine and Enjoying every little bit of it and I have you bookmarked to check out new stuff you blog post.
You made some decent points there. I looked on the internet for that problem and located most people will go in addition to with the web site.
percetakan buku online di jakarta
aqur percetakan
percetakan online Jakarta timur
jasa cetak buku murah jakarta
digital printing Jakarta timur
digital printing online timur
percetakan murah Jakarta timur
cetak murah Jakarta timur
cetak online Jakarta timur
Thank you for uploading the pattern! I’m going to make one for my 7 month old - k think she will love it!
Post a Comment