
You can see the size of it compared to my hand. My kit is stuffed "full" of many useful items. A new kit will probably have a more streamlined look...at least for a while...
You can fit so many more useful items into this kit than you can into a hard container.

Here is what the kit looks like when it is untied. The two sides are still held together with velcro.

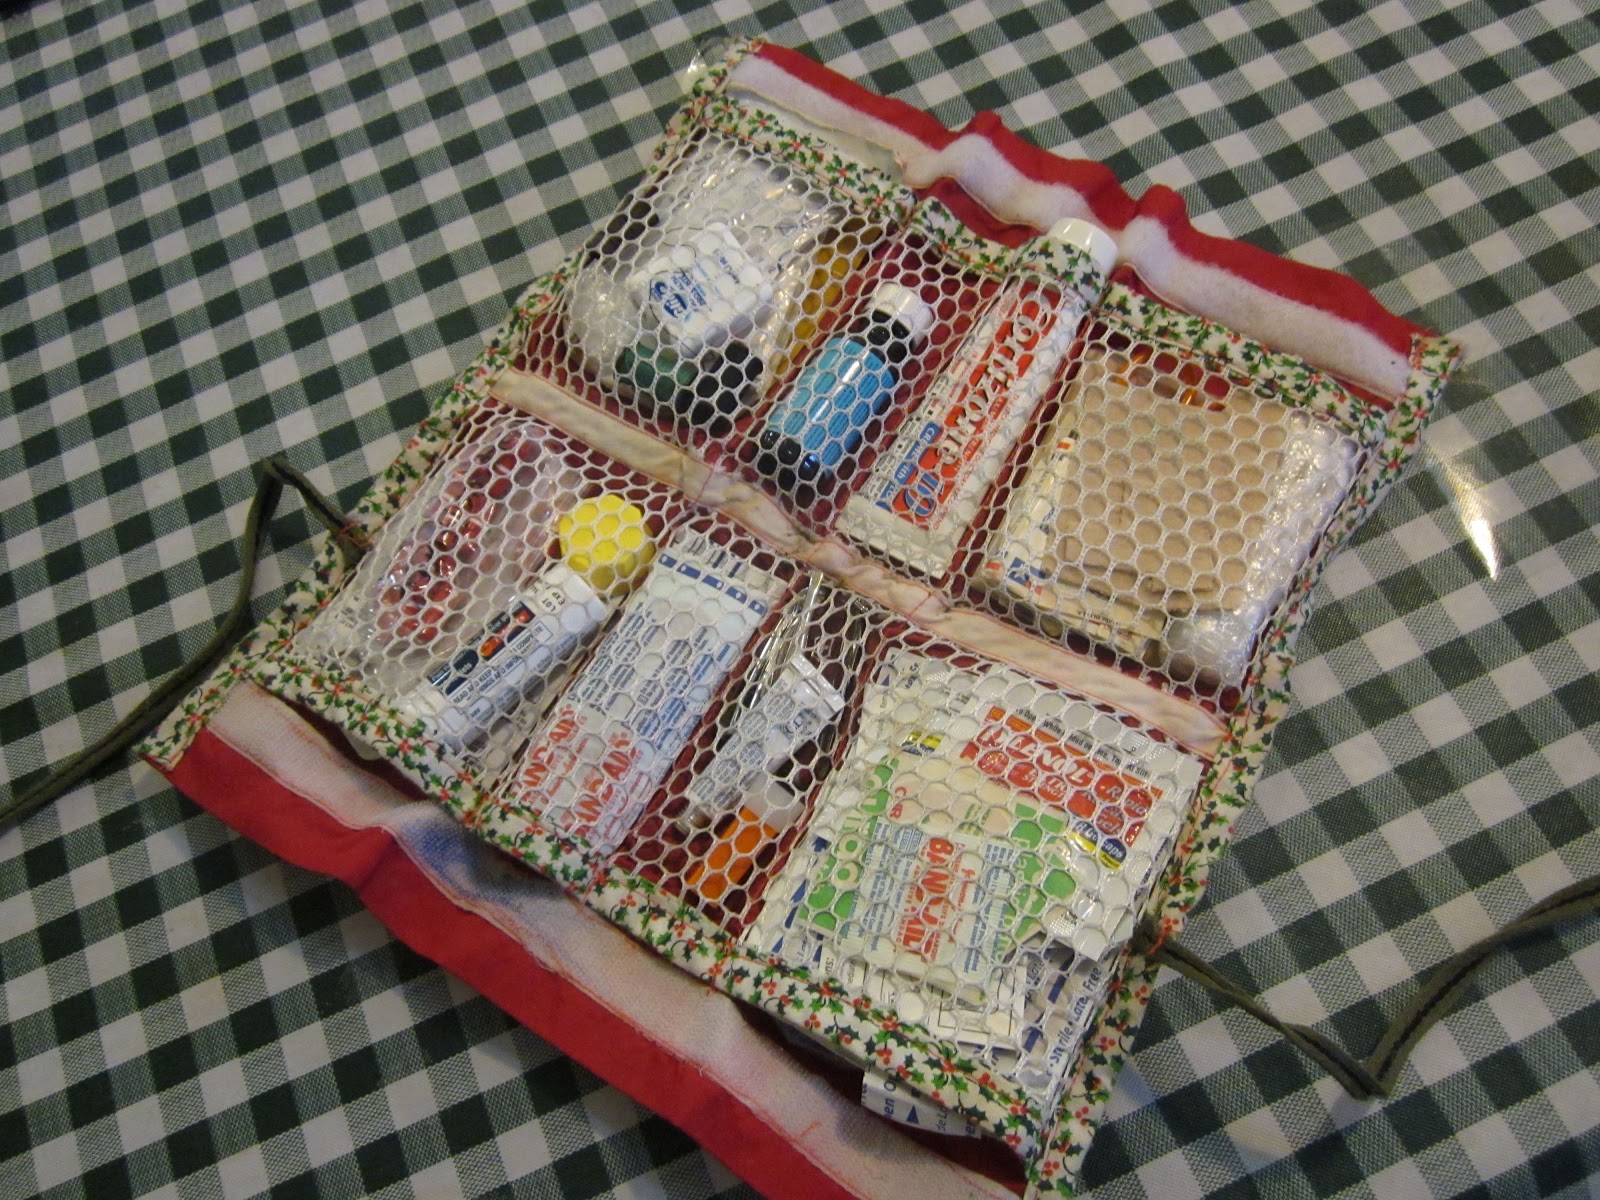
And here is the kit fully opened. This is such a great design! You can see all of your supplies at once, and you are able to retrieve exactly what you need without having to dump all of the contents.
Materials:
Rip-stop nylon 12" x 15"
Laundry mesh fabric 10" x 12"
12" sew-on velcro strip
12" single-fold bias tape
52" double-fold wide bias tape
24 or more inches of shoe lace or sturdy ribbon
Note: all of the measurements are "-ish." You can adapt the measurements to make the first aid kit smaller or larger according to your needs.
You could make the kit out of another fabric, but for durability and light weight, I strongly recommend the rip-stop nylon. You won't be sorry!
Also, do not substitute tulle for the laundry mesh. It will tear too easily. You need the stronger mesh fabric.
1. Using a cool iron, press over 1" on the shorter ends of the rip-stop nylon (the sides that are 12" long. This will make the fabric 12" x 13". (Caution - a hot iron will melt the fabric - test it on a scrap.)

2. Sew the velcro strips over the folded edge on each side, concealing the raw edge. Stitch both of the velcro edges. Sometimes my machine skips stitches with velcro...does yours do that, too? If so, just re-sew any sections where the stitches have skipped.


Now you'll be working with the piece of mesh.

3. Cut two 12" pieces of the wide double-fold bias tape.
Sew the double-fold bias tape along the 12" edge of the laundry mesh.
Do not worry about the raw ends of the bias tape. They will be covered soon.

4. Lay the finished mesh piece over the rip-stop nylon. The velcro should be facing up.

Measure to find the center of the kit, and pin the 12" piece of single-fold bias tape right along the middle. It will be like the inside "spine" of the kit.

Since the finished edges of the ripstop nylon (next to the velcro strips) are now about 13", the single-fold bias tape will probably be pinned at about 6.5 inches, so that it's half-way between. Once you have everything centered and pinned, sew along both edges of the single-fold bias tape.


5. Cut two 14" pieces of wide double-fold bias tape. Fold the ends under, and sew the double-fold bias tape along the sides of the first aid kit. This will conceal the raw edges of the fabrics, the velcro, and the other strips of bias tape.

6. Measure and pin the pockets that you will sew in the first aid kit. I like to stitch 2 pockets that are 4" wide on each (out)side, and 2 pockets that are 1.5-2" wide towards the inside. You can make the pockets any width you like, but these have worked very well for me. It will give you a total of 8 pockets.
Note: it's all right if some of the pockets are "poochy" at the bias tape edge - see the photo below. It just makes it easier to insert the items into your kit.

7. Cut 2 lengths of shoelace or other cord, 12-18" each.
Sew each one about 3.5" from the loop side of the velcro, on both ends of the first aid kit.
Go back and forth several times to make the ties very secure.

Ta-da!! Now you have a wonderful first aid kit!
Fold the velcro edges together, and then tie the ties together to secure the kit.
What will you put in it? Here's my suggested list:
I have found these items to be useful over and over again as I have used this kit for 15+ years on many outings. Yes, all of these items really do fit into this kit! That's why mine is kind of fat.
Of course you will want to replace medicines when they reach their expiration date. I shop the "travel size" section at the drug store to find tiny containers of ibuprofin and other meds. Some meds come in plastic blister packs (such as Pepto Bismol chewable tabs) and it's easy to tuck one of the blister packs into the kit.
Bandaids
Antibiotic
ointment
Floss
Cortizone
itch cream
Needle
Thread
Moleskin
Small
scissors
Matches
Latex
gloves
Alcohol
wipes
Tweezers
Fingernail
clippers
Q-tips
Pocket
knife
Super glue
Advil
Excedrin
Tylenol
Benedryl
Pepto
Bismol
5 comments:
Thanks so much for our first aid kit, Mom! I love it.
Nice, Kathy! I just "pinned" this post so that I can find it when I'm ready to make my own. :)
http://pinterest.com/jensondi/pins/
We love ours, although Scott has already started adding things to ours. :-)
When embarking on a cruise adventure, ensuring the safety and well-being of yourself and your loved ones is paramount. While cruises offer fantastic opportunities for relaxation and exploration, accidents and medical emergencies can still occur. That's why having a cruise first aid kit readily available is crucial. In this comprehensive guide, we'll walk you through everything you need to know about assembling the perfect cruise first aid kit to ensure a worry-free voyage.
Before delving into the specifics, it's essential to cover the basics of a first aid kit. Every travel size medicine kit should include essentials such as adhesive bandages, gauze pads, adhesive tape, antiseptic wipes, tweezers, cruise emergency kit scissors, and disposable gloves. These items are fundamental for addressing minor cuts, scrapes, and injuries that may occur during your journey.
Post a Comment